Tuesday, July 21, 2009

My Harlequin Rose - A Sport of Brilliant Pink Iceberg

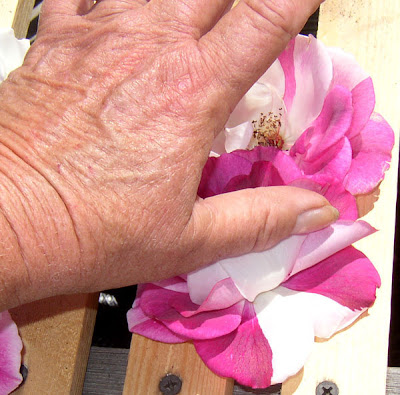
Some of you may remember my first post about a Brilliant Pink Iceberg that has always been a bummer in my garden. It did, indeed, get shovel pruned a couple of weeks ago. I do have another rose bush of that variety, though, that does reasonably well for me...go figure. This one survivor, however, has produced a sport. In case you're not familiar with the term, a sport is a genetic mutation. It usually causes one branch to produce flowers that are not true to the variety. Brilliant Pink Iceberg, for example, was a sport of Pink Iceberg, which was a sport of Iceberg (a white rose). Apparently, Iceberg (of whatever variety) is prone to genetic mutation. I've seen reports of Pink Iceberg frequently sporting back to a branch of white blooms, like it's parent Iceberg. I have not, however, been able to find anything on the net about BPI sporting half white and half pink petals and blooms like this:

Isn't that just crazy? I have two branches on this bush producing these harlequin style blooms. Even stranger, some of these blooms have petals with the 1/2 and 1/2 coloring - sometimes bright pink and white, sometimes bright pink and pale pink. Check it out:

Imagine a rose whose blooms were entirely made up of 1/2 and 1/2 petals or one that always produced the half white, half pink blooms like the one at the top left in the photo above. I'd certainly buy a rose like that, wouldn't you?

I'm taking cuttings this year to see if this unusual coloration is stable and can be replicated. Not all sports are and I don't have my hopes too high. Still...just the possibility is pretty exciting. Who knows? Maybe, one of these days you'll walk into a nursery and find a harlequin rose called "The Jester," a sport discovered by Jean LaRue.

Saturday, July 18, 2009

Are threre REALLY black roses?

...ummmm...no. The truly black rose is like the holy grail of rose breeding. So far, it only exists in mythology. In actuality, the so-called "black" roses are dark red, deep maroon, or dark purple. I like some of the black roses even if they do fall short of being truly black. They can be quite stunning in the garden, particularly when companion planted with white flowers for a stark contrast.

One of this year's additions to my garden is Black Baccara. It's difficult to capture the true color of this rose on film, but the coloring in these photos is reasonably close. When this rose is in tight bud, it's dark...really dark...and does give the illusion of a black rose. As it begins to open, however, it's obvious that it's true color is a deep maroon red.

Black Baccara was bred by Alan Meilland (France) in 2000 and introduced to the U.S. in 2002. It's classic high-centered tea rose blooms, unusual color, long thornless stems, and glossy green foliage made it an instant success with florists. Dark red roses have long been popular for use in sympathy bouquets and in floral arrangements for funeral or memorial services. What could be better for such occasions than a rose so dark red as to be almost black?

Interestingly, the Black Baccara has also become quite a popular flower for bridal bouquets. The darkest red rose symbolizes the deepest passion (or so they say). Both these bouquets would be wedding showstoppers. Don't you think? But, I digress...

As a garden flower, Black Baccara has been a great performer. I put it in a partly shaded location where it gets morning sun only. The hot afternoon sun will either scald the blooms or cause the dark color to fade badly. The color of the blooms is not only effected by too much direct sun, but varies with temperature. Cooler weather will produce much darker blooms. As it warms up, the flowers lose a good deal of the dark pigmentation and look, instead, like a the deep red of Mr. Lincoln.

If you like dark red roses, Black Baccara should be in your garden. If for no other reason, this rose is a terrific long-stem cut flower that (with care) lasts a full two weeks in the vase. I use a tablespoon of bleach in the water and then replace the water and re-cut the stems after 1 week. If you'd like to intensify the dark color, add 5 or 6 drops of India ink to the water. Just don't leave that vase where it can be knocked over by children, pets, or clumsy husbands. LOL This rose's only shortcoming for me is its lack of fragrance. I think roses should smell as beautiful as they look and seldom choose varieties that have no fragrance. This rose is so exceptional in other ways, I chose to overlook this one point.

Black Baccara may not REALLY be a black rose, but it'll do for me until something better comes along.

Thursday, July 16, 2009

Hollyhocks, Geraniums and Phlox, Oh My!

Hollyhocks remind me of my grandmother and when I think old-fashion garden flowers, they're right there with geraniums, phlox, daisies, gladiolas, and petunias. The old-fashion flowers are the perfect companions for roses, my favorite flowers of all. All of these and more are essentially mandatory if you're going for the English cottage garden style. This was my garden style for a decade or so and I delighted in it.

On the downside, the cottage garden is fairly labor intensive. Weeds are the bane of its existence and weeding is strictly a hands and knees operation. When 2 aspirin and a soak in a hot tub could no longer remedy the aches and pains of a lost weekend spent weeding, I found new homes for many of my old-fashion perennials. I ordered a dump truck load of bark, held onto the roses, and planted a select few specimen plants, like the hollyhocks, amongst the roses.

I'm down to a single large bed, a cutting garden, where I pay homage to the annuals and perennials I love. This year, geraniums, phlox, dahlias, alyssum, foxglove, petunias, zinnias and four o'clocks surround a dozen pink Simplicity roses. The weeds persist, but the task of pulling them out by their nasty little roots no longer seems like a mountain too high to climb.

The pink Simplicity roses have been a terrific choice for this bed. Simplicity is a floribunda introduced to the U.S. in 1979 by Jackson & Perkins. Simplicity is aptly named. The double blooms average just 17-25 petals and give the impression of the single bloom species roses in grandma's garden in those halcyon days before hybrid teas. When given plenty of food and water, Simplicity resists disease well. The most endearing quality, perhaps, is its delicate, perfectly formed buds. A little florist's wire and green tape - voila! - the perfect corsage or boutonniere for that special occasion. This rose grows to about 5', but can be pruned back in early spring and mid-summer to keep it from becoming too leggy. I've seen these planted cheek-by-jowl as a hedge rose, too. Absolutely stunning. They last only 3 or 4 days in a bouquet, but a pretty addition nonetheless.

Speaking of daisies...this low-growing variety is fabulous. Too many years have passed since I first planted it, so I can't tell you what name to ask for at your garden center. Unlike the Shasta variety, these are just 24" tall with a mounded growth habit, so they won't fall over at the first sign of wind stronger than a whisper. Best of all, they last more than a week in the vase. If there's anything more cheerful than daisies, I'm not sure what it is. A single plant is all you'll need. They grow rapidly in a single season and are easily divided in the fall or early spring. In a few years time, you'll have all the daisies you've ever wanted.

Here's a few more photos for you to enjoy...

"Rhumba Fire" zonal geranium, "Dreams Rose" petunias, white dwarf dahlias

"Charleston" zonal geranium - unusual coral pink color

"Blues" zonal geranium - variegated pink with pale pink eye next to "Dreams Rose" petunias

Bicolor phlox, bright pink with white star center

Double coral pink hollyhocks amongst the roses

They say that everything old is new again. If you're looking for a new direction for your garden, maybe some of these old garden flowers will fill the bill.


Monday, July 13, 2009

Worm Bin Vermicomposting Follow-Up

I received several private messages from readers interested in composting with worms - vermicomposting - asking about the availability of ready-made worm bins. I sometimes forget that not everyone is equipped for or interested in do-it-yourself projects. For you folks, I found a couple of bargain-priced worm composting bins available through Amazon that I would consider buying.

Can-O-Worms is a round, multi-level worm bin that comes highly recommended both for its function and its good looks. This one, in particular, appeals to me because it stands on legs and eliminates some of the bending and stooping I do with my home-built worm bin. It doesn't look bad, either. It's one I'd actually consider keeping in the house instead of secreted away in the garage or tool shed over the winter. It's my understanding that a properly functioning worm composter does not have an offensive odor or attract flies - an absolute MUST if I were to keep it in my house. I'm sure you feel the same way. One tip I came across suggests regularly adding a little parsley (stems or leaves) to the bin and limiting the amount of fruit scraps as insurance against odor or fruit flies. Another tip suggested putting the fruit and veg scraps through a quick whirl in the food processor before adding to the bin. It's supposed to help the worms eat it the scraps before they can rot and create odors.

It's rather cool that the Can-O-Worms has a built-in collector for the liquid worm tea with a spigot for easy dispensing. That's one of the downsides to my home-built worm bin. Collecting the worm tea requires the use of a funnel to pour it from the bottom collector tub into a storage jug. Haven't done that yet, but I expect it to be a bit messy.

Another model I like the look of is The Worm Factory. Actually, when I first considered worm composting I found a YouTube video that showed how to set up this particular worm bin. It also has the worm tea collector tray with a spigot and looks decent enough to keep in or near the kitchen. It's a little lower to the ground and square instead of round. Other than that, the Can-O-Worms and the Worm Factory seem to be functionally identical. There's about a $20-$30 price difference.

I'm constantly amazed at the range of products available through Amazon. While researching the worm composting bins, I discovered that we can also get worms called Red Wrigglers, books on vermicomposting, and even a great little stainless steel compost bucket for storing and transporting our food scraps to the worm bin or the compost pile. I just ordered one of those for my kitchen.

Thanks to all of you who wrote asking for more information on the worm composting bins. Hoping you find this post both interesting and helpful. If I've encouraged you to try composting with worms, let me know. It would be fun to keep in touch with one another so we can share our experience and compare results.

Tuesday, July 7, 2009

I've Got Worms: Vermicomposting

No, these are not my hands. In fact, this is a stock photo from an unknown source. I am using it to illustrate that even someone like me, who would be totally creeped out holding a double handful of worms, can take up vermicomposting with little or no discomfort. And, man oh man, the compost these worms create from kitchen scraps is black gold.

I've always had a not-so-hot compost pile for my garden and yard waste. Even though I understand the theory behind layering green and brown materials and turning the pile frequently to keep it aerated - in practice I dump all my trimmings on top of the pile and forget it. Just between you, me, and the garden shed, my compost pile has too much green stuff, is anaerobic (lacking oxygen), and takes at least a year to produce usable compost. I'm just not into the hard work on the business end of a pitchfork in order to make compost faster.

That's where the worms come in. They take all (or most) of the backbreaking work out of creating rich compost and do it fairly quickly - at least, that's what I've been told. The set-up and maintenance seems to be dead easy. Basically, you fill up a large Tupperware bin with shredded, moist newspapers, add a small amount of kitchen scraps (vegetables, fruits, coffee grounds, filters, and tea bags), and add 1 lb. of Red Wriggler worms. I got my worms from a dairy farm that uses them in composting cow manure and they cost $20 per pound. Theoretically, worms can consume half their body weight each day. That means I should be able to add 1/2 pound of kitchen scraps each day, burying the scraps under the top layer of newspaper to keep down odors and fruit flies. At the end of 5-6 months (or so I'm told) this first bin will be full of super-rich brown compost and power packed with worm castings (a.k.a. worm poo).

No sweat. No complicated layering of brown and green materials. No back-breaking turning of a pile with a pitchfork. Just feed the worms, they eat, they poop, and I get compost for the garden. Bonus...in addition to the compost, I also get "worm tea." This is a concentrated miracle liquid that leaches out of the compost. 1 Tbsp. to a gallon of water makes a wonderful liquid fertilizer or a rejuvenating tonic for weak or sickly plants. Worm tea comes highly recommended by almost everyone on the orchid forum I visit. It's saved many an orchid from dying the death of a rag doll at the hands of newbie and expert orchid growers alike.

If you'd like to give worm composting a try, here's a link for more information on constructing a worm bed. Let me know if you decide to give it a go. I'd love to hear from other gardeners who (like me) will try anything once.

Backyard Wildlife Habitat

With all of the focus these days on organic gardening, "green" technologies, and protecting the environment, I thought I'd post a little something on certifying your garden as a wildlife habitat through the National Wildlife Federation. It's easy to do and I don't think there's anything better than kicking back with a cup of coffee and watching birds and critters as they enjoy our gardens, too.

The first step toward certifying your garden is to provide birds and animals with the things they need most: food, water, shelter, and a place to raise their young. Just as important is avoiding the use of chemical fertilizers, herbicides, or pesticides. With compost, fish fertilizer, neem oil and insecticidal soap, I am able to feed and protect the garden while feeding and protecting the wildlife I've invited to be here.

Food sources include seeds, nuts, berries, nectar, and native plants. In my yard, I provide two bird feeders and use a wild bird seed mix that includes sunflower seeds. The small birds (sparrows and finches) eat the small seed and toss the sunflower seed to the ground for the squirrels. I also provide two nectar feeders for the hummingbirds and butterflies. Most summers I have an abundance of apples, plums, black currants, raspberrries, and blueberries that I don't mind sharing. So far, no one has been a glutton so they leave enough for me to eat and freeze.

I provide two sources of fresh water. There's a small pond with a fountain and a small concrete birdbath placed near the bird feeders. The birds and squirrels use both. The raccoons, neighborhood cats, and frogs prefer the pond. I am careful to keep the birdbath clean and filled daily with fresh water.

Shelter and a place to raise young are both provided by dense shrubs and trees for nesting. Over the years I've had sparrows, robins, and finches build nests in the garden. While I'm not sure where the squirrels are giving birth, I do have a couple of mama's who bring their young as soon as they're ready to forage for food.

The sparrow fledglings follow mom to the feeders, but still insist on being fed. My DH caught this photo this past week.

There's been a few surprise visitors to my garden - some that I'd rather wouldn't make it a habit to stop by. The little brown rabbits are adorable, but hard on the vegetable garden. Wiley C. Coyote wants to make a meal of the other critters, including my pet cat. And, the blue herons will eat every fish and frog in the pond if I don't shoo him away. I try to remind myself that we all have our place in the food chain. Even so, I keep a protective eye on the cat.

The most unusual visitor so far is this guy...

Pheasants are seldom seen here on the island and I've never seen one taking a stroll down the sidewalk on a city street. This one walked through the front yard and around to the backyard where he made a bee-line for the seed on the ground beneath the feeders. It was like he knew exactly where to go. Now, I wonder who told him about my garden?